Commercial Products
Open Source
Examinator Reference Application
Examinator is a reference application in the form of an online testing application. It illustrates how Terracotta's products are used to deliver:
- High-availability—Significant reduction in cluster downtime
- Scale-out—Ability to adapt to growing load
- Database offload—Substantial gains in speed and efficiency
Tutorial
This tutorial shows you how to quickly install, configure, and run Examinator, a multi-instance test-taking web application with a database store. You can run Examinator instances in both an unclustered mode (without the Terracotta Server Array) and a clustered mode (with the Terracotta Server Array). Tests demonstrating that in-memory data distributed with a Terracotta cluster remains coherent are also provided.
Initial Setup
The following sections show how to set up Examinator, its database, and email properties required for registering new users.
Note: You must have JDK 1.5.x or greater installed. Run java -version in a terminal window to confirm the JDK version. Be sure you have an appropriate JDK installed before proceeding.
Download the Examinator Package
Find the latest version of Examinator in the Terracotta Download Catalog ›
Unpack the Examinator package in the desired parent
directory. The name of the Examinator home
directory, which is created under the chosen parent
directory, has the format examinator-<version>.
We will refer to this location throughout this
document as examinator.
Create the Database
1. Start the H2 database server from the Examinator home directory:
UNIX/Linux:
bin/h2db.sh start
Windows:
bin\h2db.bat start
You can stop the database with the command h2db.sh stop
2. Create the database schema:
UNIX/Linux:
bin/h2db.sh create-exam-db
Windows:
bin\h2db.bat create-exam-db
3. Confirm that the database is set up:
UNIX/Linux:
bin/h2db.sh console
Windows:
bin\h2db.bat console
A console login similar to the following should appear in your browser:
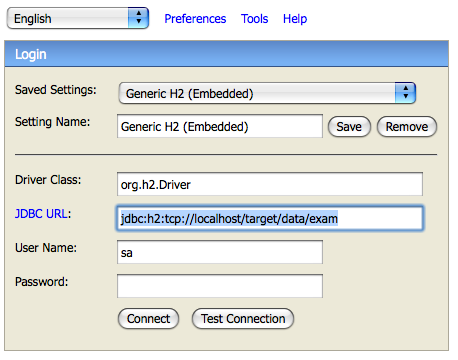
Enter the value
jdbc:h2:tcp://localhost/target/data/exam in the JDBC
URL field. All other fields can remain unchanged.
Click Connect. You should see the exam database schema listed in the left-hand panel of the console.
Default Data
The first time Examinator starts up, its bootstrap functionality adds default users to the database. During subsequent startups, the application adds the default data only if it isn't present. The default data consists of the following administrator and user accounts (username - password):
admin1 - passwd1
admin2 - passwd2
admin3 - passwd3
admin4 - passwd4
admin5 - passwd5
student1 - passwd1
student2 - passwd2
student3 - passwd3
student4 - passwd4
student5 - passwd5
If this is the initial installation of Examinator, this default data has not yet been added.
Configure Examinator to Use an SMTP Server
The exam application requires access to an SMTP mail
server to send confirmation emails for new
accounts. You configure an SMTP server in the
mail.properties file located in examinator/webapps/examinator/WEB-INF/classes.
Note. If you use only the default accounts shown in the default data above, an SMTP mail server is not required because no confirmation emails need to be sent.
To configure mail.properties, add the following properties:
- examinator.from.email – An email address that represents the sender.
- smtp.host - The address of any available SMTP server.
The remaining properties in mail.properties set the text that appears in the subject of different types of emails. A configured mail.properties file should appear similar to the following:
examinator.from.email=MyAddress@MyCompany.com
smtp.host=mail.MyCompany.com
subject.signup.confirmation=Welcome to Examinator
subject.password.reset.confirmation=Password reset confirmation
subject.password.reset.done=Your password has been resetm
Download, Install, and Configure Terracotta Cluster
Be sure to download a compatible version of Terracotta. Version mismatches may lead to errors. Compatible versions are found in the Terracotta Download Catalog ›
- Download Terracotta
- Set the following environment variable:
We will refer to the installation directory as terracotta.
TC_INSTALL_DIR=<path to terracotta
installation directory>
Run the Exam Application Without Terracotta Clustering
To disable Terracotta clustering in Examinator, you must edit the following configuration files (found under ${EXAMINATOR_HOME}/webapps/examinator) by removing or commenting out the indicated elements:
/WEB-INF/web.xml(HttpSession clustering)
- <filter> block containing <filter-name>terracotta-filter</filter-name>
- <filter-mapping> block containing <filter-name>terracotta-filter</filter-name>
/WEB-INF/classes/ehcache.xmland/WEB-INF/classes/ehcache-hibernate.xml(cache-instance clustering)
- <terracotta/> in each <cache> and <defaultCache> elements
- <terracottaConfig url="localhost:9510"/>
/WEB-INF/classes/quartz.properties(clustered in-memory job store)
org.quartz.jobStore.classorg.quartz.jobStore.tcConfigUrl
After editing the configuration files, follow these steps:
- Ensure that no other servlet container is running on ports 8080/8081. Connecting to http://localhost:8080 and http://localhost:8081 should fail.
- Start the database if it isn't running.
- Change to the Examinator home directory and start the first node:
- Repeat the previous step, changing the port number to 8081. Check console.log under work/8080/logs and work/8081/logs to make sure both Jetty instances finish starting up. Jetty is running when you see this type of message:
UNIX/Linux:
bin/startNode.sh 8080
Windows:
bin\startNode.bat 8080
INFO: Started SelectChannelConnector@0.0.0.0:8080
Two instances of Examinator should now be running, served by two Jetty instances and backed by a database.
Verify the Application Is not Clustered
With two instances of Examinator running, it is possible to test how data is handled and presented in an environment lacking Terracotta clustering. The test should demonstrate that while committed data is shared, in-memory data remains completely independent even in a case where it should be coherent. That is, data that has been committed to the database appears the same no matter which session accesses it, while data that is only in memory on the two nodes can quickly lose integrity as the application state diverges. In the second case, each session sees different data.
Create a User Account
Note. This demonstration requires Examinator to have access to an SMTP mail server.
1. Connect to http://localhost:8080/examinator and click the Register link.
2. Fill in the form and submit it. A confirmation email is sent to the address you provided containing an URL similar to http://localhost:8080/examinator/registration/confirm.do and a confirmation code. Do not click the URL.
3. Copy the indicated URL from the confirmation email to your browser's Location field and edit it so the port reads 8081 (in place of 8080) and the context path "examinator2" (in place of "examinator"). The URL should now look like http://localhost:8081/examinator2/registration/confirm.do ›
4. Go to the confirmation page using the changed URL.
5. In the confirmation email, copy the confirmation code. You need the confirmation code to complete the registration process.
6. Complete the registration on the confirmation page by filling in the form, then click Finalize. The registration attempt is rejected due to invalid data.
7. Using a different browser or browser tab, connect to the original URL: http://localhost:8080/examinator/registration/confirm.do ›
8. Complete the registration on the confirmation page by filling in the form, then click Finalize. The registration is accepted.
Since the application is not clustered, you can not switch between application servers without losing the session. The second instance of the application does not know about the pending registration held by the first instance. This is because unconfirmed registration data does not get committed, remaining in memory to help maximize performance.
Take an Exam
1. Log in to the new user account: http://localhost:8080/examinator ›
2. Click Take an Exam.
3. Choose an exam and, following the on-screen directions, begin to answer questions.
4. Log into the same user account http://localhost:8081/examinator2 ›
5. Click Take an Exam and attempt to take the same exam.
Results
To maximize performance, incomplete exams remain in memory. But since the application is not clustered with Terracotta, a second exam is started from the beginning, completely independent of the first exam already being taken. This happens even though:
- Both sessions are using the same user account
- the user is taking the same exam
- the same database data is being accessed (see, for example, the exams offered and exam results). Note that questions which were answered during the first session appear again in the second, unanswered. Also, the time remaining to finish the second exam begins with the total time allowed, even though the first exam's allowed time has been run down since that exam started. The second instance of the application does not know about the exam being taken by the user in the first instance.
Running the Exam Application With Terracotta Clustering
Before proceeding, shut down the Jetty instances from the previous demonstration. Change to the Examinator home directory and stop the first node:
UNIX/Linux:
bin/stopNode.sh 8080
Windows:
bin\stopNode.bat 8080
Stop the second node using the same command but changing the port number to 8081.
You must put the Terracotta Toolkit runtime JAR file, called terracotta-toolkit-on the Examinator classpath. The runtime JAR is found in terracotta/common. Be sure to use the runtime JAR found in the Terracotta kit you download to use with Examinator.. For example, Terracotta 3.4.1 contains terracotta-toolkit-1.1-runtime-2.1.1.jar.
You must also restore the configuration elements that enable clustering (see Run the Exam Application Without Terracotta Clustering).
1. Change to the Terracotta installation directory and start a Terracotta server instance:
UNIX/Linux:
bin/start-tc-server.sh
Windows:
bin\start-tc-server.bat
2. Change to the Examinator home directory and start the Jetty application servers:
UNIX/Linux:
bin/startCluster.sh
Windows:
bin\startCluster.bat
Check console.log under work/8080/logs and work/8081/logs to make sure both Jetty instances finish starting up. Jetty is running when you see this type of message:
INFO: Started SelectChannelConnector@0.0.0.0:8080
Verify the Application is Clustered
There are a number of ways to see how Terracotta introduces clustering to the exam application. Some examples are given below.
Create a User Account
Note. This demonstration requires Examinator to have access to an SMTP mail server.
1. Connect to http://localhost:8080/examinator and click the Register link.
2. Fill in the form and submit it. A confirmation email is sent to the address you provided containing an URL similar to http://localhost:8080/examinator/registration/confirm.do and a confirmation code. Do not click the URL.
3. Copy the indicated URL from the confirmation email to your browser's Location field and change the port to 8081. The URL should now look like http://localhost:8081/examinator/registration/confirm.do.
4. Go to the confirmation page using the changed URL.
5. In the confirmation email, copy the confirmation code. You need the confirmation code to complete the registration process.
6. Complete the registration on the confirmation page by filling in the form, then click Finalize.
7. Using a different browser or browser tab, connect to http://localhost:8080/examinator and log into the new account.
Results
Since the application is being clustered with Terracotta, you can switch between application servers without losing the session. The second instance of the application knows about the pending registration held by the first instance despite the fact that the data is in memory only.
Take an Exam
1. Log in to the new user account using http://localhost:8080/examinator
2. Click Take an Exam.
3. Choose an exam and, following the on-screen directions, begin to answer questions.
4. Log into the same user account using http://localhost:8081/examinator.
5. Click Take an Exam and attempt to take the same exam.
Results
Since the application is being clustered with Terracotta, a second attempt to take the exam shows an exam in progress. Note that questions which were answered during the first connection appear answered, and that the time remaining to finish the exam is the same in both instances. The second instance of the application knows about the user's exam-in-progress on the first instance despite the fact that the data is in memory only.