Commercial Products
Open Source
Terracotta Cloud Tools Tutorial
Follow these steps to run a Terracotta clustered application on the Amazon Elastic Compute Cloud (EC2).
What You Will See:
- An enterprise web application deployed in the cloud using Terracotta's configuration-driven cloud deployment automation
- Ehcache distributed cache for scaling the application tier without database bottlenecks.
- Web session replication for seamless user experience and high availability in an elastic cluster.
- Spin up and tear-down application servers on the fly for elastic compute power on demand
- Spin up and tear-down Terracotta server stripes for elastic throughput and data management on demand.
What You Will Need:
- An Amazon AWS account with S3 and EC2 activated.
- Familiarity with starting EC2 instances. If you have never used EC2 before, the AWS EC2 getting started guide is a good place to start.
- Terracotta's cloud tools.
- Terracotta installed on your local computer.
- A system with that can run shell and perl scripts. This tutorial was prepared on Mac OS X and tested on Linux.
 |
Download Terracotta Cloud ToolsDownload the Terracotta cloud tools code. This project contains the bootstrap tooling to package your application and deploy it, clustered with Terracotta, in the cloud:
Unpack The Cloud Tools
%> tar xfvz var="cloud-tools-binary-name"--> We'll refer to the cloud tools directory in the following tutorial steps as <cloud-tools>. Install Perl Modules You may need to install some perl
modules required by the cloud tools—specifically, On MacOS X, these can be installed by running following (and accepting defaults to questions asked): sudo /usr/bin/perl -MCPAN -e 'install Config::Tiny' sudo /usr/bin/perl -MCPAN -e 'install Net::Amazon::EC2' See the CPAN documentation for details on installing perl modules using CPAN. |
 |
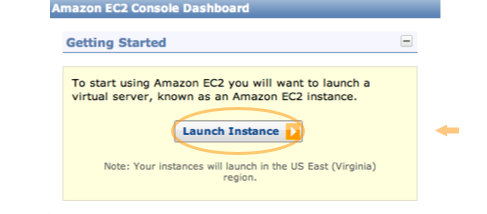
Start Bootstrap InstanceThe bootstrap instance is the only EC2 instance that you need to start manually in the cloud. This is the instance to which the configuration is pushed from your local machine, and the node that provisions the other instances and the load balancer. For the purposes of keeping the number of required EC2 instances as low as possible for this tutorial, the bootstrap instance is also used as a node of the Terracotta Server Array and also the default database location. However, the topography of the cloud is fully configurable to suit the individual needs of your applicaiton. Using the AWS Management Console, locate and start an instance of the Terracotta-provided AMI called 'ami-2f8d6246'. Start The "Launch Instance" Wizard
Search For Terracotta's AMI Click on the "Community AMIs" tab and search for the Terracotta-provided AMI called
Select The Terracotta AMI Click the "Select" button.
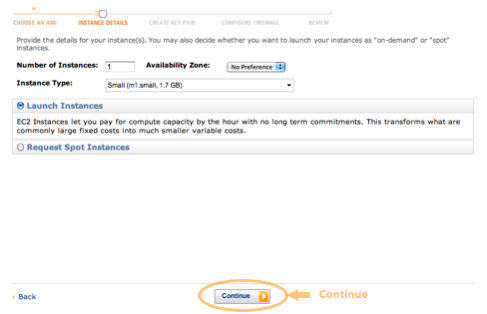
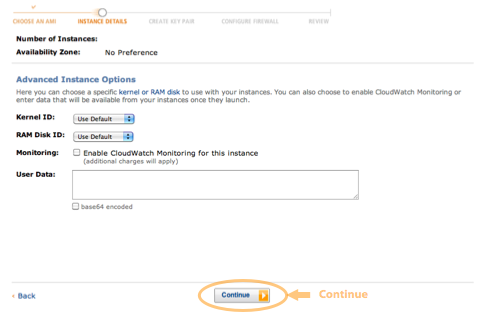
Note: as of this writing, the "Select" button is hidden on some browsers. It seems to work properly in Google Chrome on some operating systems. Continue Past The Next Two Instance Details Screens Click "Continue" on the first screen using the default values:
Then, click "Continue" on the next screen, also using the default values:
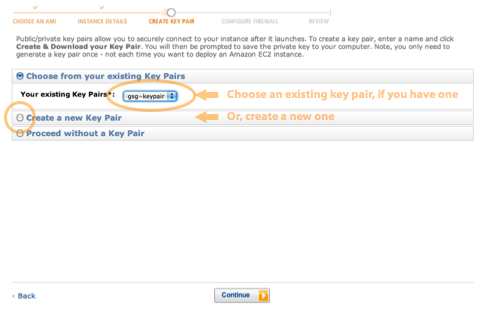
Select Or Create A Key Pair A key pair is a security credential similar to a password, which you use to securely connect to EC2 instances once they are running. If you haven't already generated one, you can create a new one. Detailed instructions for creating a keypair may be found in Amazon's EC2 getting started guide.
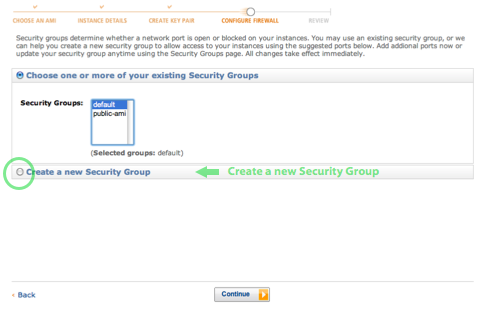
Important. You will need access to the key pair file later in this tutorial, so be sure to keep that file handy. Create A Security Group For Terracotta A "Security Group" in EC2 is a way of specifying firewall rules for a group of EC2 instances. This tutorial will require a few ports to be opened to work properly. To do this, create a new security group called 'l2securitysettings' and configure it to allow SSH connections. To create the security group, choose the "Create a new Security Group" option in the "Configure Firewall" page:
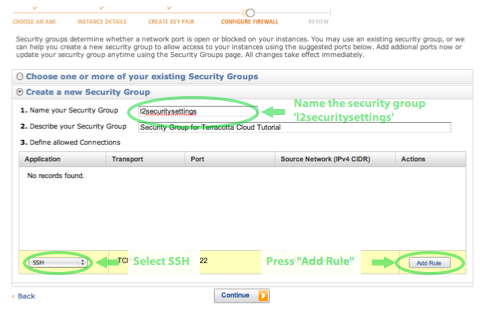
Name the security group 'l2securitysettings'. Then, add SSH to the list of allowed connections.
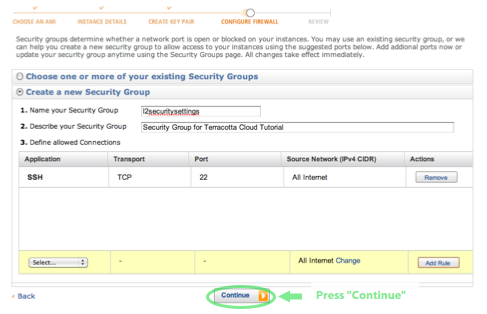
Note: Since this AWS EC2 administration wizard offers only a few options for allowed connections, we will add the rest of the allowed connections later in the tutorial. Continue past the firewall configuration page:
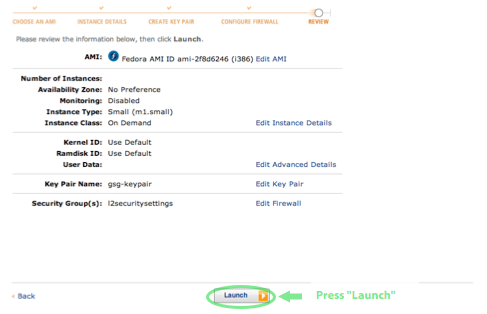
Review the launch configuration, then press "Launch":
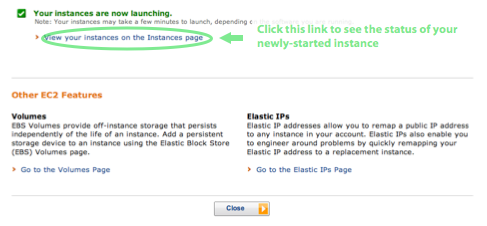
Important. Once you launch an instance, you will be charged by Amazon as long as it is running. BE SURE TO SHUT DOWN YOUR INSTANCES WHEN YOU ARE NOT USING THEM. Click the link to view the status of your new instance:
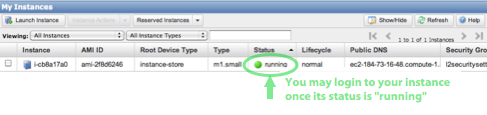
When the instance status says "running," it is ready for use.
|
 |
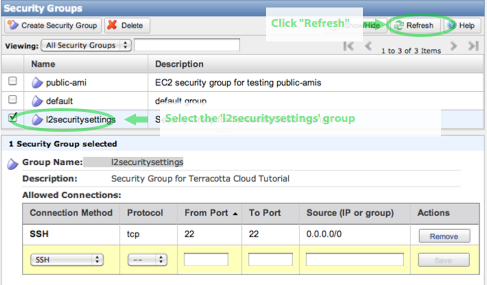
Finish Security Group ConfigurationWhen setting the bootstrap instance, we created a security group, but we still need to allow a few more connections. To do this, open the "Security Groups" configuration page in the AWS Management Console:
Select The Note: You may need to click the "Refresh" button to make the new security group show up in the list.
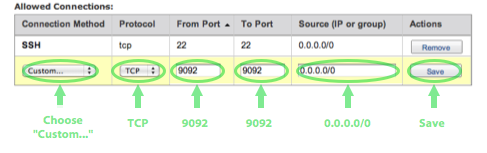
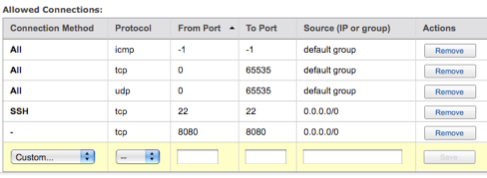
Allow Connections To The Following Ports
Start by allowing port 9092:
Allow the rest of the ports in the same way. When you are done, your configuration should look like this:
Check Default Security Group Your default security group should already be configured properly, but to make sure, see that all of the following entries are in your default security group:
|
 |
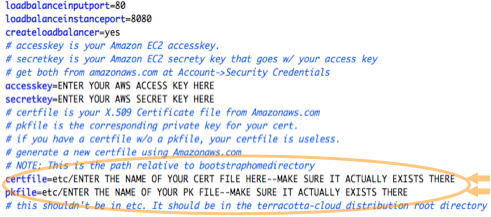
Copy AWS Files To The Cloud Tools DirectoryYou must copy three of your AWS-generated files to the cloud tools directory. The cloud tools scripts are very sensitive to the names and locations of these files, so make sure you put them in the proper places and use the right names. Copy Your Key Pair File Locate the keypair file for the key pair that you used to start the bootstrap instance. Copy that keypair file to the top-level <cloud-tools> directory. Copy Your X.509 Certificate And Private Key If you don't already have valid X.509 credential files, see the "Security Credentials" section of your account at AWS. Once you have the credential files, copy both the certificate file (its name should start with |
 |
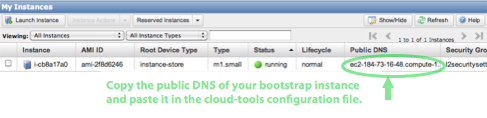
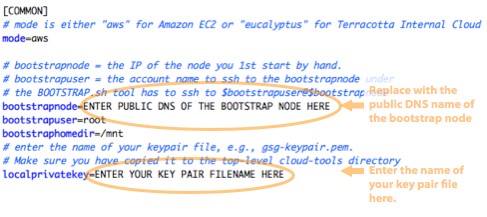
Configure Cloud ToolsThe main configuration file for the cloud tools scripts is <cloud-tools>/terracotta-cloud.cfg There are a number of configuration lines you must edit with the particulars of your AWS account and your running bootstrap instance, as follows. Configure The DNS Name Of The Bootstrap Node Copy the public DNS name of the bootstrap node you started from the AWS administration console:
Paste the public DNS name of the bootsrap node into the cloud tools configuration file. Also paste the name of the keypair file that you copied into the top-level cloud-tools directory. This will have a name like 'gsg-keypair.pem':
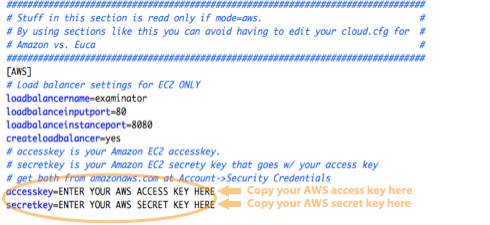
Configure AWS Access Key and Secret Key
Configure X.509 Credentials Enter the names of the X.509 certificate and private key files that you copied into the
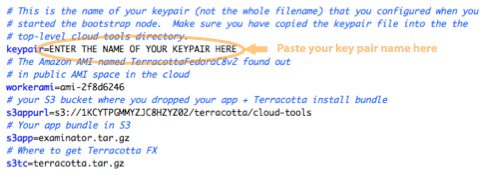
Configure Key Pair Name In the "[AWS]" section, paste the name of the keypair (not the whole filename) that you copied into the top-level cloud-tools directory. It will have a name like 'gsg-keypair':
|
 |
Prepare The Bootstrap InstanceRun BUNDLE.sh prepares a bundle of software to install on the bootstrap node:
%> ./BUNDLE.sh Run
%> ./BOOTSTRAP.sh The bootstrap instance is now running and ready to create and start your application cluster. |
 |
Start The Application ClusterThe next step is to start a cluster of application servers and Terracotta servers. The cloud tools on the bootstrap instance automatically coordinate starting the required EC2 machine instances and install and start the application and Terracotta servers on their respective cluster nodes. You can use the cloud tools to start any application, but for this tutorial, we will use Terracotta's reference web application, "Examinator". Both the Examinator application bundle that we will deploy and the Terracotta enterprise kit are downloaded automatically by the cloud tools from S3 from the following URLs: Login To Bootstrap Instance Use ssh and your key pair credentials to login to the bootstrap instance:
%> ssh -i <keypair-file> root@<bootstrap-hostname> Run The cloud tools are automatically installed in /mnt. Change directories to /mnt and run START-ALL.sh to start up application nodes and Terracotta server instances.
%> cd /mnt
%> ./START-ALL.sh 2 4
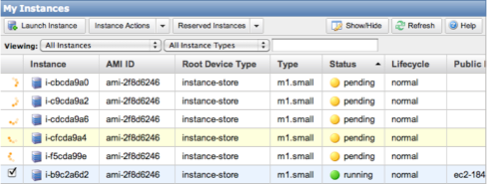
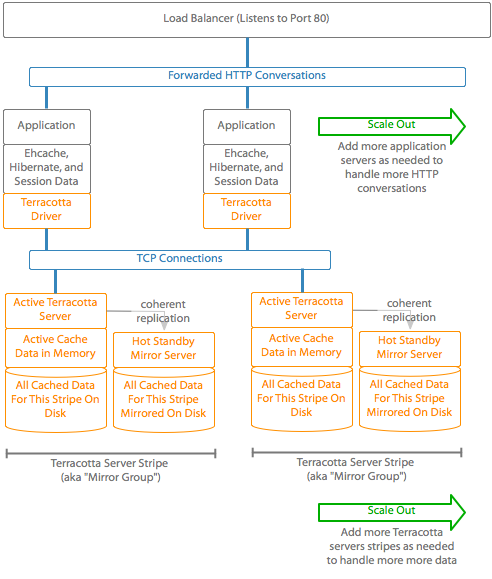
This command will create two application server instances and four Terracotta server instances comprising two Terracotta server stripes. Later in the tutorial, we will use this same script to spin up more application servers and more Terracotta server stripes on the fly. For more information on the benefits of Terracotta server striping, see the Enterprise Ehcache product page. Check Instances In AWS Management Console As the cloud tools scripts are starting the EC2 instances, you will see the pending instances in the AWS Management Console:
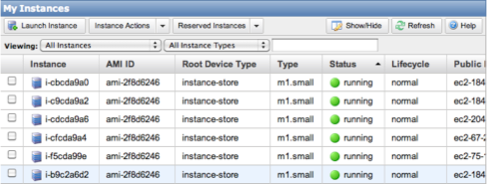
When they have all started, the instances page of the AWS Management Console should look like this:
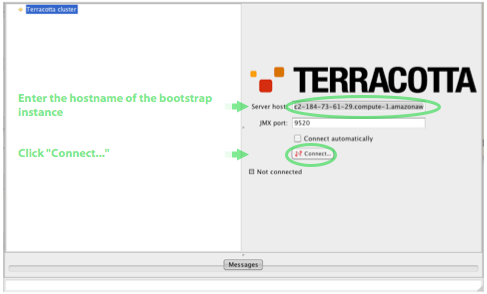
Check Cluster State In Terracotta Console After the EC2 instances have started, you can check on the status of the Terracotta cluster with the Terracotta developer console. The Terracotta developer console gives you visibility into the Terracotta cluster. We'll use it to monitor the state of the application. From your local computer, run the Terracotta developer console:
%> /path/to/terracotta/dev-console.sh Now, connect to the Terracotta server running on the bootstrap instance:
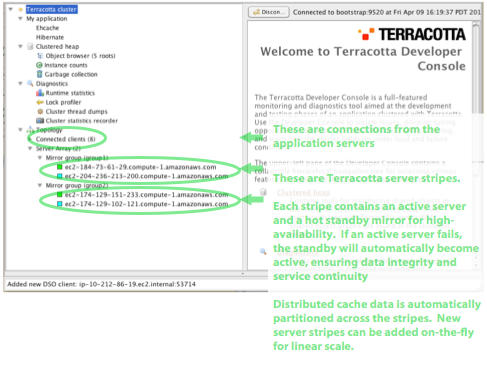
When the cluster is fully up and running, you will see 8 connections from the application servers and two Terracotta server stripes, each with an active server and a hot standby mirror server.
Cloud Architecture
|
 |
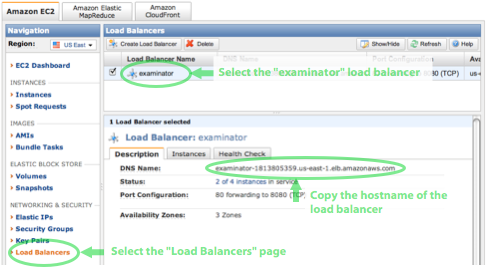
Try The ApplicationWhen the application cluster has fully started (this may take a few minutes), you can try using it in your web browser. Get The Hostname Of The Load Balancer The cloud-tools automatically configured a load balancer which accepts incoming HTTP requests and balances them to the application servers that are each running an instance of the application. Terracotta ensures scalability and data availability for the application servers, so that user and application context (like HTTP session and distributed cache data) is transparently available when the application server cluster behind the load balancer grows or shrinks. To try the application, you need to know the hostname of the loadbalancer. You can find it by looking at the loadbalancer screen in the AWS Management Console:
Point your web browser at the following URL:
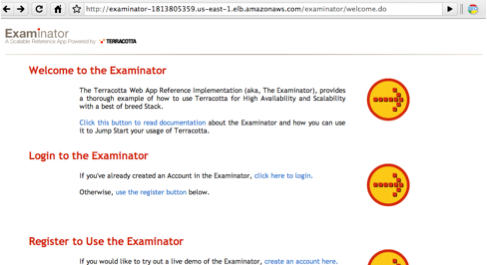
You will see the examinator running in your browser:
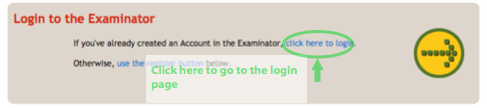
Log In Follow the link to the login page:
Log in as a student (username: student1/password: passwd1).
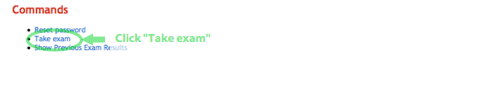
In the this tutorial, we are using a round-robin load balancer, so your first web request is sent to the first application server, your second request is sent to the second application server, and so on. Terracotta's distributed cache and web sessions replication services allow for a seamless user experience and maximum database caching when running a cluster of application servers. Examinator uses Spring Security to handle authorization and authentication. Terracotta seamlessly maintains your login state, even as the load balancer forwards your web requests to different application servers. Note: round-robin load balancing is ideal for demonstration purposes, but a production application may require a slightly more sophisticated load balancing algorithm. Take Exam Click the "Take exam" link to start taking an exam:
The next screen shows available exams (as of this writing, there's only one):
As this page is loaded, the exam data is cached by Ehcache configured as a Hibernate second-level cache. Further access to the exam data is provided from the cache, eliminating hundreds of calls per user session to the exam database. Because this is a distributed cache, once the exam data is loaded into cache on one application server, it is also read from cache in all of the other application servers. This enables linear scalability by allowing as many application servers to run as needed to meet demand, without any increase in load to the database. And, because this is running in the cloud, you can scale your application tier elastically to meet peak usage demand without placing any additional load on your data tier. Shut Down EC2 Instances And Load BalancerIMPORTANT. ONCE YOU YOU HAVE FINISHED THE TUTORIAL, BE SURE TO SHUTDOWN ALL THE RUNNING INSTANCES AND DELETE THE EXAMINATOR LOAD BALANCER FROM THE AWS CONSOLE. You will be charged by Amazon as long as they are running. |
Next StepsWe'd love to hear how you got on with this tutorial and what you plan to do next with terracotta in the cloud, so please email us your feedback to pm@terracottatech.com › |