Open Source
Securing Terracotta Clusters
Introduction
Note: For a brief overview of Terracotta security with links to individual topics, see Security Overview.
Terracotta clusters can be secured using authentication, authorization, and encryption. You can use:
- the built-in authentication and authorization
- external directory services
- certificate-based Secure Sockets Layer (SSL) encryption for communications between nodes
Security in a Terracotta cluster includes both server-server connections and client-server connections. Security must be enabled globally in the cluster. This ensures that each and every connection is secure, including connections in the Terracotta Management Server.
Overview
Security is set up using the Terracotta configuration, tools provided in the Terracotta kit, standard Java tools, and public key infrastructure (via standard digital X.509 digital certificates).
Security-Related Files
Each Terracotta server uses the following types of files to implement security:
- Java keystore – Contains the server's private key and public-key certificate. The keystore is protected by a keystore/certificate-entry password.
- Truststore – A keystore file containing only the public keys of the certificates. This file is needed only if you are using self-signed certificates rather than a Certificate Authority (CA).
- Keychain – Stores passwords, including the passwords to the server's keystore and to entries in other files. The tools for creating and managing the Terracotta keychain file are provided with the Terracotta kit.
- Authorization – A
.inifile with password-protected user accounts and their roles for servers and clients that connect to the server.
Note that Microsoft Active Directory and standard LDAP authentication/authorization are available options.
The standard Java cacerts file, located in ${JAVA_HOME}java.home/lib/security by default, is a system-wide repository for CA root certificates included with the JDK. These certificates can play a part in certificate chains. Java documentation recommends that the cacerts file be protected by changing its default password and file permissions.
|
Each Terracotta client also has a keychain file that stores the password it uses to authenticate with the server.
All files are read on startup. Changes made to the files after startup cannot be read unless the cluster is restarted.
Process Diagram
The following diagram illustrates the flow of security information during initial cluster connections. It also shows which security-related file originates the security information:
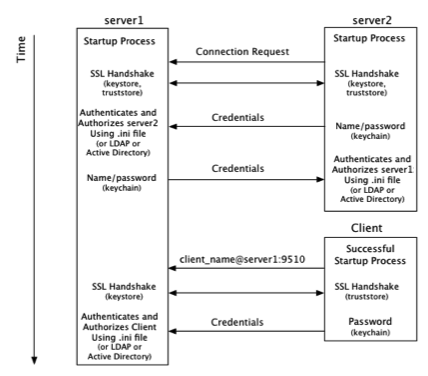
From a Terracotta server point of view, security checks take place at the time a connection is made with another node on the cluster:
- After startup, servers can make connection requests to servers named in the configuration.
- A connection request from server2 initiates the process of establishing a secure connection using SSL.
- Server1 authenticates server2 using stored credentials. Credentials are also associated with a role that authorizes server2. The process is symmetrical: server2 authenticates and authorizes server1.
- A connection request from a Terracotta client initiates the process of establishing a secure connection using SSL.
- Server1 authenticates and authorizes the client using stored credentials and associated roles.
Because a client might communicate with any active server in the cluster during its lifetime, the client must be able to authenticate with any active server. Clients should be able to authenticate against all servers in the cluster because active servers might fail over to mirror servers.
From a Terracotta client point of view, security checks occur at the time the client attempts to connect to an active server in the cluster:
The client uses a server URI that includes the client username.
A typical (non-secure) URI is
<server-address>:<port>. A URI that initiates a secure connection takes the form<client-username>@<server-address>:<port>.A secure connection using SSL is established with the server.
- The client sends a password fetched from a local keychain file. The password is associated with the client username.
Configuration Example
The following configuration snippet is an example of how security can be set up for the servers in the illustration above:
<tc:tc-config xmlns:tc="http://www.terracotta.org/config">
...
  <servers secure="true">
    <server host="172.16.254.1" name="server1">
    ...
      <security>
        <ssl>
          <certificate>jks:server1alias@/the/path/keystore-file.jks</certificate>
        </ssl>
        <keychain>
          <url>file:///%(user.dir)/server1keychain.tkc</url>
        </keychain>
        <auth>
          <realm>com.tc.net.core.security.ShiroIniRealm</realm>
          <url>file:///%(user.dir)/my_auth.ini</url>
          <user>server1username</user>
        </auth>
      </security>
   ...
   </server>
    <server host="172.16.254.2" name="server2">
    ...
      <security>
        <ssl>
          <certificate>jks:server2alias@/the/path/keystore-file.jks</certificate>
        </ssl>
        <keychain>
          <url>file:///%(user.dir)/server2keychain.tkc</url>
        </keychain>
        <auth>
          <realm>com.tc.net.core.security.ShiroIniRealm</realm>
          <url>file:///%(user.dir)/my_auth.ini</url>
          <user>server2username</user>
        </auth>
      </security>
   ...
   </server>
   ...
 </servers>
...
</tc:tc-config>
For more information on the configuration elements in the example, see the configuration section below.
Setting Up Server Security
To set up security on a Terracotta server, follow the steps in each of these procedures:
NOTE: Script names in the examples given below are for UNIX or Linux systems. Equivalent scripts are available for Microsoft Windows in the same locations. For Windows, replace the .sh extension with .bat and convert path delimiters as appropriate.
Create the Server Certificate and Add It to the Keystore
Each Terracotta server must have a keystore file containing a digital certificate and the associated private key. This document assumes that you will use self-signed certificates.
IMPORTANT SECURITY CONSIDERATION!: Self-signed certificates might be less safe than CA-signed certificates because they lack third-party identity verification and do not carry a digital signature from an official CA. Your organization might already have policies and procedures in place regarding the generation and use of digital certificates and certificate chains, including the use of certificates signed by a Certificate Authority (CA). To follow your organization's policies and procedures regarding using digital certificates, you might need to adjust the procedures outlined in this document.
When used for a Terracotta server, the following conditions must be met for certificates and their keystores:
- The keystore must be a Java keystore (JKS) compatible with JDK 1.6 or higher.
- The certificate must be keyed with the alias named in the value of the
<certificate>element of the server's configuration. - The Common Name (CN) field in the Distinguished Name must contain the hostname of the server, as configured in the server's configuration.
- The password securing the certificate must match the keystore's main password. In other words, the store password and key passwords must be identical.
- When using a self-signed certificate (not one signed by a trusted CA), create a custom truststore for storing public keys.
- If security is not the most important consideration, you can set the following Java system properties as shown:
-Dtc.ssl.trustAllCerts=true(use any certificates)-Dtc.ssl.disableHostnameVerifier=true(bypass hostname verification)
If you have a keystore in place, but the server certificate is not already stored in the keystore, you must import it into the keystore. If the keystore does not already exist, you must create it.
Creating Self-Signed Certificates Using Java Keytool
For testing purposes, or if you intend to use self-signed certificates, use the Java keytool command to create the public-private key pair. You also use this command to create keystores and truststores, but note that keytool refers to truststores as "keystores" since there is only a logical difference.
Note that if you are not using cacerts, the default Java truststore, the custom truststore must be specified with the javax.net.ssl.trustStore system property. In this case, you can choose to reset the custom truststore's default password with javax.net.ssl.trustStorePassword. |
The following could be used to create both public-private keys (including a certificate) and a keystore file for the server called "server1" in the configuration example above:
keytool -genkey -keystore keystore-file.jks -dname "CN=172.16.254.1, OU=Terracotta, O=SAG, L=San Francisco, S=California, C=US" -alias server1alias -storepass server1pass -keypass server1pass
Note that the values passed to -storepass and -keypass match. Also, the field designating the Common Name (CN) must match the server's hostname, which matches the value entered in the server's configuration. This hostname can be an IP address or a resolvable domain name. If the -dname option is left out, a series of identity prompts (distinguished-name fields based on the X.500 standard) will appear before the server's entry is created in the keystore. The CN prompt appears as shown:
What is your first and last name?
   [Unknown]:
There are a number of other keytool options to consider, including -keyalg (cryptographic algorithm; default is DSA) and -validity (number of days until the certificate expires; default is 90). These and other options are dependent on your environment and security requirements. For more information on using the keytool, see the JDK documentation.
Create a keystore and entry on each Terracotta server.
Exporting and Importing Certificates
Each server should have a copy of each other server's public-key certificate in its truststore.
The following could be used to export the certificate of the server called "server1" in the configuration example above.
keytool -export -alias server1alias -keystore keystore-file.jks \
    -file server1SelfSignedCert.cert
This "cert" file can now be used to import server1's certificate into the truststore of every other server. For example, to create a truststore and import server1's certificate on server2, copy the cert file to the working directory on server2 and use the following command:
keytool -import -alias server1alias -file server1SelfSignedCert.cert \
    -keystore truststore.jks
After the password prompt, information about the certificate appears, and you are prompted to trust it. You must repeat this process until every server has a truststore containing the public-key certificate of every other server in the cluster.
| Instead of recreating the truststore on every server, create a single truststore containing every server's public key, then copy that to every server. This same truststore can also be used for clients. See Using a Client Truststore. |
Set Up the Server Keychain
The keystore and each certificate entry are protected by passwords stored in the server keychain file. The location of the keychain file is specified in the value of the <url> element under the <keychain> element of the server's configuration file.
For example, with this server configuration, when the server starts up, the keychain file would be searched for in the user's (process owner's) home directory. In the configuration example, a keychain file called server1keychain.tkc is searched for when server1 is started.
The keychain file should have the following entries:
- An entry for the local server's keystore entry.
- An entry for every server that the local server will connect to.
Entries are created using the keychain script found in the Terracotta kit's tools/security/bin directory.
Creating an Entry for the Local Server
Create an entry for the local server's keystore password:
tools/security/bin/keychain.sh -O <keychain-file> <certificate-URI>
where <keychain-file> is the file named in the server configuration's <keychain>/<url> element (including correct path), and <certificate-URI> is the URI value in the server configuration's <ssl>/<certificate> element. Note: The <certificate-URI> must match the server configuration's <ssl>/<certificate> element exactly, including the path to the keystore.
By default, the keychain file stores passwords using an obfuscation scheme, requiring the use of -O (hyphen capital letter O) with the keychain script for any operation on the file. To switch a more secure encryption-based scheme, see Using Encrypted Keychains.
If the keychain file does not exist, add the -c option to create it:
tools/security/bin/keychain.sh -O -c <keychain-file> <certificate-URI>
You will be prompted to enter a password to associate with the URI. You must enter the same password used to secure the server's certificate in the keystore.
For example, to create an entry for server1 from the configuration example above, enter:
tools/security/bin/keychain.sh -O server1keychain.tkc jks:server1alias@/the/path/keystore-file.jks

Terracotta Management Console - Keychain Client
Enter the password you want to associate with this URL:   server1pass
Confirm the password to associate with this URL:   server1pass
Password for jks:server1alias@/the/path/keystore-file.jks successfully stored
Creating Entries for Remote Servers
Entries for remote servers have the format tc://<user>@<host>:<group-port>. Note that the value of <user> is specified in each server configuration's <security>/<auth>/<user> and is not related to the user running as the process owner. If a value for <security>/<auth>/<user> is not specified, the username "terracotta" is used by default.
For example, to create an entry for server2 in server1's keychain, use:
tools/security/bin/keychain.sh -O server1keychain.tkc tc://server2username@172.16.254.2:9530
If the keychain file does not exist, add the -c option:
tools/security/bin/keychain.sh -O -c server1keychain.tkc tc://server2username@172.16.254.2:9530
You will be prompted to enter a password to associate with the entry server2username@172.16.254.2:9530.
An entry for server1 must also be added to server2's keychain:
tools/security/bin/keychain.sh -O server2keychain.tkc tc://server1@172.16.254.1:9530
Set Up Authentication/Authorization
Servers and clients that connect to a secured server must have credentials (usernames/passwords) and roles (authorization) defined. This section discusses the authentication/authorization mechanism based on using a .ini file. To use LDAP or Microsoft Active Directory instead, see the LDAP and Active Directory setup page.
Authentication and authorization are set up using the usermanagement script, located in the Terracotta kit's tools/security/bin directory. This script also creates the .ini file that contains the required usernames and roles. The associated passwords are stored in the keychain file.
All nodes in a secured Terracotta cluster must have an entry in the server's .ini file:
- The local server itself
- All other servers
- All clients
Use the usermanagement script with the following format:
tools/security/bin/usermanagement.sh -c <file> <username> terracotta
where -c is required only if the file does not already exist. For servers, the <username> will be used as the value configured in <security>/<auth>/<user>. For clients, the username must match the one used to start the client.
Note: While the "terracotta" role is appropriate for Terracotta servers and clients, the "admin" role is necessary for performing system functions such as stopping servers. For more information about roles, refer to the User Roles section.
For example:
# Create the .ini file and add a server username and role.
tools/security/bin/usermanagement.sh -c my_auth.ini server1username terracotta

# Add another server.
tools/security/bin/usermanagement.sh my_auth.ini server2username terracotta

# Add a client.
tools/security/bin/usermanagement.sh my_auth.ini client1username terracotta

# Add a user with an "admin" (read/write) role.
tools/security/bin/usermanagement.sh my_auth.ini admin1username admin

# Add a user with a "terracotta" (read) role.
tools/security/bin/usermanagement.sh my_auth.ini console1username operator
The correct Apache Shiro Realm must be specified in the server configuration, along with the path to the .ini file:
...
<auth>
  <realm>com.tc.net.core.security.ShiroIniRealm</realm>
  <url>file:///%(user.dir)/my_auth.ini</url>
  <user>server1username</user>
</auth>
...
Configure Server Security
Set up the security for the Terracotta Server Array in the Terracotta configuration file, which is named tc-config.xml by default. For example:
<tc:tc-config xmlns:tc="http://www.terracotta.org/config">
...
  <servers secure="true">
    <server host="172.16.254.1" name="server1">
    ...
      <security>
        <ssl>
          <certificate>jks:server1alias@/the/path/keystore-file.jks</certificate>
        </ssl>
        <keychain>
          <url>file:///%(user.dir)/server1keychain.tkc</url>
        </keychain>
        <auth>
          <realm>com.tc.net.core.security.ShiroIniRealm</realm>
          <url>file:///%(user.dir)/my_auth.ini</url>
          <user>server1username</user>
        </auth>
      </security>
   ...
   </server>
   ...
 </servers>
...
</tc:tc-config>
Every server participating in an SSL-based secured cluster must have a <security> block in which the security-related information is encapsulated and defined. The keystore, keychain, and .ini files named in the configuration must be available to every server in the cluster. LDAP or Microsoft Active Directory can be configured in place of file-based authentication and authorization.
The following table defines some of the security-related elements and attributes shown in the configuration example.
| Name | Definition | Notes |
|---|---|---|
| secure | Attribute in <servers> element. Enables SSL security for the cluster. DEFAULT: false. | Enables/disables SSL-based security globally. |
| certificate | Element specifying the location of the server's authentication certificate and its containing keystore file. The format for the certificate-keystore location is jks:alias@/path/to/keystore. "alias" must match the value used to key the certificate in the keystore file. | Only the JKS type of keystore is supported. |
| url | The URI for the keychain file (when under <keychain>) or for the authentication/authorization mechanism (when under <auth>). These URIs are passed to the keychain or realm class to specify the keychain file or authentication/authorization source, respectively. | These files are created and managed with the keychain and usermanagement scripts. If using Microsoft Active Directory or LDAP, an LDAP or LDAPS connection is specified. The configured URL for locating the keychain file can be overridenn with the property com.tc.security.keychain.url. |
| realm | The Shiro security realm that determines the type of authentication/authorization scheme being used: file-based (.ini), Microsoft Active Directory, or standard LDAP. | This element's value is specified in the section covering the setup for the chosen authentication/authorization scheme. |
| user | The username that represents this server and is authenticated by other servers. This name is part of the server's credentials. Default username is "terracotta" |
Enabling SSL on Terracotta Clients
Terracotta clients do not require any specific configuration to enable SSL connections to a Terracotta Server Array.
NOTE: Script names in the examples given below are for UNIX and Linux systems. Equivalent scripts are available for Microsoft Windows in the same locations. Replace the .sh extension with .bat and convert the path delimiters as appropriate.
To enable SSL security on the client:
Prepend the client username to the address used by the client to connect to the cluster.
This should be the username that will be authenticated followed by an "at" sign ("@") and the address of an active server running in secure mode. The format is
<client-username>@<host>:<tsa-port>. Prepending the username automatically causes the client to initiate an SSL connection.If the client has username
client1, for example, and attempts to connect to the server in the configuration example, the address would be:client1@172.16.254.1:9510This URI replaces the address
<host>:<tsa-port>used to start clients in non-SSL clusters.Verify that the client username and its corresponding password match those in the server's .ini file or credentials in LDAP or Active Directory. The username is included in the URI, but the password must come from a local keychain entry that you create.
The client credentials must be associated with the role "terracotta" or "admin".
If Terracotta servers are using self-signed certificates (not certificates signed by a well-known CA), then you must specify a truststore for the client that contains the public key of every server in the cluster.
Create a Keychain Entry
The Terracotta client should have a keychain file with an entry for every Terracotta server in the cluster. The format for the entry uses the "tc" scheme:
tc://<client-username>@<host>:<tsa-port>
An entry for the server in the example configuration should look like:
tc://client1@172.16.254.1:9510
Use the keychain script in the Terracotta kit to add the entry:
tools/security/bin/keychain.sh -O clientKeychainFile tc://client1@172.16.254.1:9510
By default, the keychain file stores passwords using an obfuscation scheme, requiring the use of -O (hyphen capital letter O) with the keychain script for any operation on the file. To switch a more secure encryption-based scheme, see Using Encrypted Keychains.
If the keychain file does not already exist, use the -c flag to create it:
tools/security/bin/keychain.sh -O -c clientKeychainFile tc://client1@172.16.254.1:9510
You will be prompted to enter a client password to associate with the URI.
This entry in the client's keychain file serves as the key for the client's password and is provided to the server along with the client username ("client1" in the example). These credentials must match those in the server's .ini file or LDAP or Active Directory credentials.
The Terracotta client searches for the keychain file in the following locations:
%(user.home)/.tc/mgmt/keychain%(user.dir)/keychain.tkc- The path specified by the system property
com.tc.security.keychain.url
Example Using the Keychain Script
When you run the keychain script, the following prompt should appear:
Terracotta Management Console - Keychain Client
KeyChain file successfully created in clientKeychainFile
Enter the password you wish to associate with this URL:
Password for tc://client1@172.16.254.1:9510 successfully stored
Note that the script does not verify the credentials or the server address.
Using a Client Truststore
If Terracotta servers are using self-signed certificates (not certificates signed by a well-known CA), create a truststore on the client and import each server's public-key certificate into that truststore.
If you have already created a truststore for a server in the TSA, you can copy that file to each client after first importing that server's public-key certificate into the copy.
For the client to find the truststore, you must set the Java system property javax.net.ssl.trustStore to the location of the truststore file. In this case, note the existing secrets for opening the truststore and accessing each certificate.
To change the existing truststore master password, use the Java system property javax.net.ssl.trustStorePassword.
|
Security With the Terracotta Management Server
Additional configuration is required for using a secured TSA with the Terracotta Management Server (TMS):
Configuring Identity Assertion
Add the following to each server's <security> block:
<security>
...
  <management>
    <ia> https://my-tms.mydomain.com:9443/tmc/api/assertIdentity</ia>
    <timeout>10000</timeout>
    <hostname>my-l2.mydomain.com</ hostname >
  </management>
</security>
where:
<timeout>is the the timeout value in milliseconds for connections from the server to the TMS.<ia>is the HTTPS (or HTTP) URL with the domain of the TMS, followed by the port 9443 and the path/tmc/api/assertIdentity.If you are using HTTPS, which is recommended, export a public key from the TMS and import it into the server's truststore. You must also export a public key from the server and import it into the TMS's truststore, or copy the server's truststore (including the local server's public key) to the TMS.
<management><hostname>is used only if the DNS hostname of the server does not match server hostname used in its certificate. If there is a mismatch, enter the DNS address of the server here.
You must export a public key from the TMS
JMX Authentication Using the Keychain
The following is required for server-to-client REST-agent authorization. Every node in the cluster must have the following entry in its keychain, all locked with the identical secret:
jmx:net.sf.ehcache:type=RemoteAgentEndpoint
In addition, server-server REST-agent communication must also be authorized using a keychain entry with the following format:
jmx://<user>@<host>:<group-port>
Note that the value of <user> is specified in each server configuration's <security>/<auth>/<user> and is not related to the user running as process owner.
For example, to create an entry for server2 in server1's keychain, use:
tools/security/bin/keychain.sh -O server1keychain.tkc jmx://server2username@172.16.254.2:9530
Each server must have an entry for itself and an entry for each other server in the TSA.
Setting Up Security on the TMS
An unsecured TMS cannot connect to a secured TSA. To learn how to set up security on the TMS, see Terracotta Management Console Security Setup.
Restricting Clients to Specified Servers (Optional)
By default, clients are not restricted to authenticate a specific set of servers when responding to REST requests. However, it is possible to explicitly list the servers that a client can respond to by using the <managementRESTService> element's securityServiceLocation attribute in the Ehcache configuration.
When this attribute is empty (or missing), no such restriction exists and the client will authenticate against any server in the cluster that meets the established security requirements. This is the recommended setting because SSL connections and the mechanism for authentication and authorization provide sufficient security.
In the case where an extra layer of security is required for the client's REST service, you can configure a list of allowed servers as follows:
<managementRESTService ...
  securityServiceLocation=" https://my-l2-node1/tmc/api/assertIdentity ,
     https://my-l2-node2/tmc/api/assertIdentity ">
where my-l2-node1 and my-l2-node2 are the servers' hostnames. However, any of the servers in a client's cluster can forward a REST request to that client at any time, Therefore, if this feature is used, all the servers should be listed.
Running a Secured Server
Start a server in a secure Terracotta cluster using the start-tc-server script. If you are using encrypted keychains, a master password must be entered at the command line during server startup (or set the server to automatically fetch the password).
Confirm Security Enabled
You can confirm that a server's security is enabled in the following ways:
- Look for the startup message
Security enabled, turning on SSL. - Search for log messages containing "SSL keystore", "HTTPS Authentication enabled", and "Security enabled, turning on SSL".
- Attempt to make JMX connections to the server—these should fail.
Stopping a Secured Server
Stop a server in a secure Terracotta cluster using the stop-tc-server script with the following arguments:
-f <tc-config-file>— A valid path to the self-signed certificate must have been specified in the server's configuration file.-u <username>— The user specified must have the "admin" role.-w <password>
Note: If you are using a self-signed certificate (not one signed by a trusted CA), set the following Java system properties as shown:
- -Dtc.ssl.trustAllCerts=true (use any certificates)
- -Dtc.ssl.disableHostnameVerifier=true (bypass hostname verification)
For more information about the stop script, refer to Start and Stop Server Scripts.
Troubleshooting
You might encounter any of the following exceptions at startup:
TCRuntimeException: ... Wrong secret provided ?
The following exception indicates that the keychain file uses the default obfuscation scheme, but that the -O flag was not used with the keychain script:
com.tc.exception.TCRuntimeException: com.terracotta.management.keychain.crypto.SecretMismatchException: Wrong secret provided ?
Be sure to use the -O flag whenever using the keychain script.
No Configured SSL certificate
The following exception indicates that no SSL certificate was found for the server named "myServer":
Fatal Terracotta startup exception:


*********************************************************************
Security is enabled but server myServer has no configured SSL certificate.
*********************************************************************
Check that the expected SSL certificate was created for myServer and stored at the configured location.
IllegalStateException: Invalid cluster security configuration
This exception can occur when the security section in the Terracotta configuration file is not set up properly. However, this type of exception can also indicate problems elsewhere in the security setup. For example, an exception similar to the following can occur:
java.lang.IllegalStateException: Invalid cluster security configuration. Unable to find connection credentials to server myOtherServer
This exception indicates that credentials cannot be found for the server named "myOtherServer". These credentials might be missing from or do not exist in the configured authentication source.
RuntimeException: Couldn't access a Console instance to fetch the password from!
This results from using "nohup" during startup. The startup process requires a console for reading password entry. You cannot run the startup process in the background if it requires manual password entry. For information on how to avoid having to manually enter the master keychain password, see Running a Secured Server.
TCRuntimeException: Couldn't create KeyChain instance ...
The keychain file specified in the Terracotta configuration cannot be found. Check for the existence of the file at the location specified in <keychain>/<url> or the property com.tc.security.keychain.url.
RuntimeException: Couldn't read from file ...
This exception appears just after an incorrect password is entered for an encrypted keychain file.
RuntimeException: No password available in keyChain for ...
This exception appears if no keychain password entry is found for the server's certificate. You must explicitly store the certificate password in the keychain file.
This exception can also appear if the resolved hostname or IP address is different from the one in the keychain entry:
tc://terracotta@localhost:9530is the entry, but when the server configuration is read thenlocalhostis resolved to an IP address. The entry searched for becomestc://terracotta@<a.certain.ip.address>:9530.tc://terracotta@<a.certain.ip.address>:9530is the entry, but when the server configuration is read then<a.certain.ip.address>is resolved to a host name. The entry searched for becomestc://terracotta@my.host.com:9530.
Two Active Servers (Split Brain)
Instead of an active-mirror 2-server stripe, both servers assert active status after being started. This exception can be caused by the failure of the SSL handshake. An entry similar to the following might appear in the server log:
2013-05-17 12:10:24,805 [L2_L2:TCWorkerComm # 1_W] ERROR com.tc.net.core.TCConnection - SSL handshake error: unable to find valid certification path to requested target, closing connection.
For each server, ensure that all keychain entries are accurate, and that the required certificates are available from the appropriate truststores.
No Messages Indicating Security Enabled
If servers start with no errors, but there are no messages indicating that security is enabled, ensure that the <servers> element contains secure="true".